This page is dedicated to my hobby of metal working. I have been interested in this for some time now, at least since I lived in Portland. More recently, I really thought about having one of these machines for working on my trains.
Certain projects, such as the SD40-45, could have really used it.
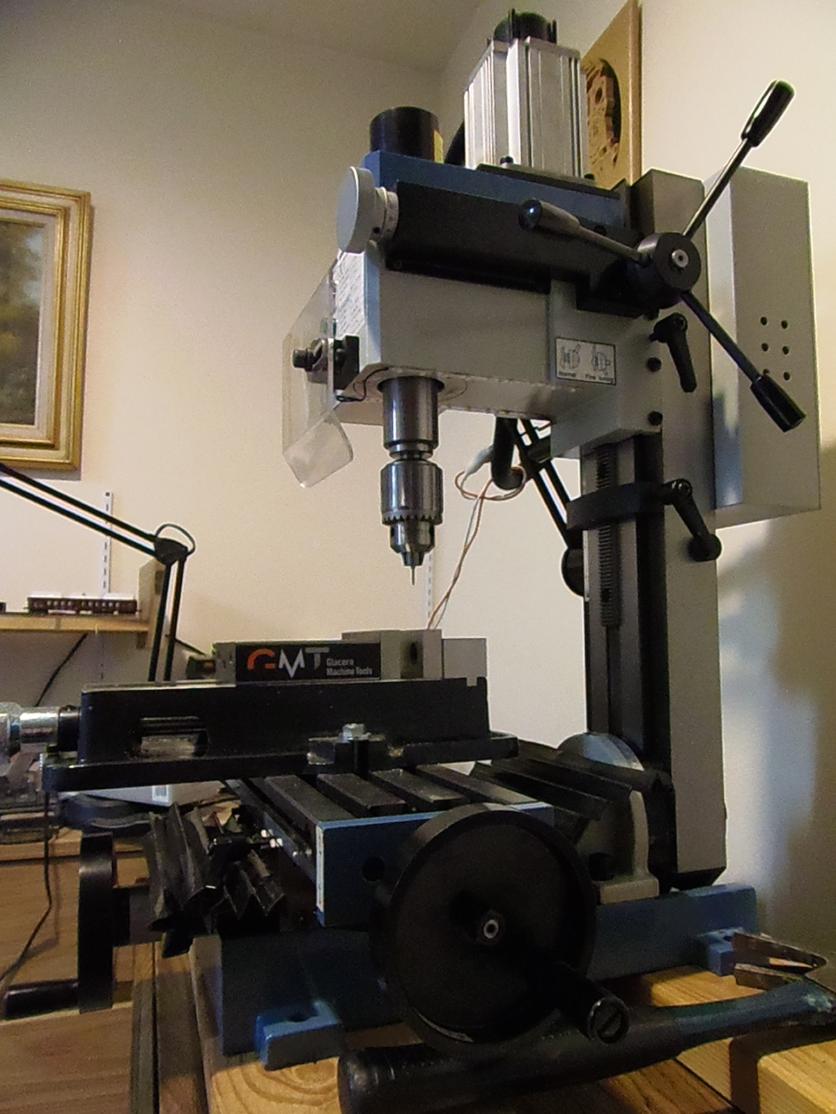
The machine I wound up purchasing is an X2 class. Every machine of this class is made by a Chinese company by the name of Sieg. They make a lot of these machines, paint them different colors, and sell them to different companies. There are variations on size, capacity, power, etc.
My machine is considered to be an SX2L.
S = more powerful motor, 500 watts vs 350
X2 = size. Less than 100 pounds.
L = Larger table, and more travel.
I purchased the unit from LittleMachineShop.com. I can highly recommend them, as they have most everything you could want for one of these machines. It does take some running around on their website to find it all, but it is there. I didn't know this when I ordered the machine, else I would have picked up some additional equipment to take advantage of the freight I was already paying. Oh well.
Research
Here are some initial thoughts when I received the machine.
Here are some other machines I looked at as well.
Micro Mark High Precision Heavy Duty R8 Miniature Milling Machine
The machine I considered the most is the Micro-Mark Mini Mill. The main reason being that they use different leadscrews that take 20 revolutions to move the table an inch, as opposed to every other machine that uses an oddball 16 turns to the inch. It basically is the difference of a 0.050" per turn movement for the MM machine, and .0625" for the others. It seems an odd number, but perhaps that leadscrew size is a common product. I don't know.
The Grizzly machine I also considered, but ultimately decided against, as they have a showroom in Washington state, so I would have to pay sales tax and shipping on top of the cost of the mill itself.
I looked for a while at the Sherline and Taig mills, but they are an X1 size, and I wanted something a little bigger. I also didn't like the exposed belt-work on the Taig.
The Harbor Freight mill was considered, but set aside due to the fact I'd still have to pay tax, though not shipping.
I looked at the LMS mill and liked the larger size table, larger movements, and more powerful motor. I also liked the belt drive being already built in. Everywhere I went, that was the one mod everybody said you needed to do to these mills to make them better. Having it already built in at the factory is a benefit I liked the sound of. I have my machine set up in my apartment, so noise reduction is a concern to me.
The more I looked, the more I liked the Micro Mark machine for the movement in 0.050" increments per hand-wheel turn. Why then, did I end up with another mill?
The answer is in my future plans for CNC. The conversion kits for modifying one of these mills to CNC all involve replacement of the leadscrew with a ballscrew that is much more accurate and removes almost all the backlash. Since I would have to replace the leadscrews anyway, the MM machine no longer held an advantage. After that consideration was removed, then capacity, power, and design became more important. The LMS mill won on all three over all other mills. Hence the reason I own one.
Tooling
They say you'll easily spend as much on tooling as you do on the machine itself. I believed it before I started purchasing everything. The spreadsheet I created to track what items I wanted, and where to purchase them, as well as pertinent information regarding these items ran well over three pages.
Collets hold cutters, drill bits, edge-finders, etc. You can use collets and collet holders, or end mill holders. I chose to go with a collet setup. I currently have two collets, on 1/2" and one 3/8".
I did not want to buy a set of collets, or make a large investment in them, as I wanted to do CNC in the future. Part of that conversion would be to add in a tool changer, possibly a Tormach system. That system comes with a series of collets to hold the milling bits, so having a bunch of extra collets around didn't seem like something I really wanted. I decided to buy just the collets I found myself actually needing.
Edge finder
The 1/2" is for my edge finder, which didn't work. The collet worked just fine. The edgefinder didn't. I purchased an electronic one that should have lit up when contact was made with metal. It didn't work. I called up Enco, where I ordered it from, and they set me up with an RMA. The lady on the phone told me I would see a credit for the old unit when it was returned, and a charge for the new. Essentially a wash.
Not only that, but they would actually have someone go out in the warehouse, pull the replacement, and make sure it worked before they sent it to me. I thought that sounded good. I wasn't entirely sure the edge finder worked, if it was actually broken, or if I just didn't know how to use it. Being smarter than the average bear, I pulled the LED inside the unit and tested it, and it lit up when power was applied. End result? Parts of it worked, but the overall unit...didn't.
Well, I saw the credit come through for the old unit, and the charge for the new. Two weeks went by, and no delivery. I checked my credit card again, and found another credit.
Apparently none of the SPI electronic edge finders they had in stock were functional. As I have no experience with SPI, I can't really say if this is a one time thing, just a bad design, or if you're just taking a chance when you order something made by them.
In any case, I can recommend ordering from Enco. When they told me they would actually test the next unit to make sure it worked before it left their warehouse, that made me feel a lot better. Then I would know that any failure to make it work would be due to me not knowing what I was doing, not the equipment failing.
Milling Bits
I picked up a 6-pack of milling bits to have some tooling. It looked like a good idea, being all the same shank size. I should only need one collet for everything!
Well, after I received them, I found out I overlooked just what size collet I needed to hold the milling bits. At that point, I had to order a 3/8" collet so I could use the milling bits I'd ordered.
On the plus side, once I had the right collet, it was nice to be able to use any milling bit with the same collet.
One thing I will warn you about. Those little milling bits are sharp! I cut myself with one without even trying, so do be careful when handling them.
Drill bit chuck
A drill bit chuck is included with some of the other mills. Not the LMS mill. They include a piece that will hold the chuck, but not the chuck itself. I purchased one and it fits and holds the drill bits. Not much more that I can say about that.
It does come with a chuck key, which was not clear on any of the sites I visited.
One thing I have noticed is an annoying tendancy to come loose from the part that the chuck mounts to. That's why I don't really like using this thing, as I'm not quite sure it's going to actually stay attached like it should. For drilling, this isn't a problem, as the downward force used to drive the bit into the work keeps things together. The retraction, however, means it could pull free and drop onto the work.
If this happens, your work could get damaged. If this happens while things are powered up, you and your work could get damaged. I think you can purchase a solid unit that is chuck and holder all in one piece, so if this is a large concern to you, that is one way to fix the problem. Of course, using a collet to hold the drill bit is perfectly acceptable, also.
There are also key-less chucks available as well. They are considerably more expensive than the key versions, which was why I decided to use a keyed version. If you have bad experiences with leaving chuck keys in a chuck, then the extra cost for a key-less version may well be worth it to you.
Vise
Perhaps one of the biggest parts of the mill purchase is the vise. They come in all sorts, sizes, and functions.
All the research I conducted seemed to indicated that the gold-standard of vises is the Kurt brand. The 6" Kurt D688 seemed to be well thought of in every forum I visited.
Alas, a D688 was not in the cards for this machine. Just too big. It would likely work fine on a Bridgeport, or even something as small as an X3-class, but even the larger table on mine wouldn't handle that vise without being seriously constrained.
One other brand I found mention of was the Glacern Machine Tool company. They manufacture some really nice units, and they cost a little less than the Kurt brands as well. I actually wanted a 6" precision vise they had, but again, it wouldn't fit on my table. Grrr...
Looking around their site further, I found a 4" wide vise that would fit...for the most part. It actually hangs off the side considerably, but it is more or less balanced to sit on the table.
You know you're not dealing with some little vise when you pick one of these things up. Wherever you put it, it will sit there, and it will stay there, and not much is going to move it.
The vise came with two keys mounted to the bottom. I've heard arguments both ways for the use of keys, and I decided since this was my first change to actually "tram" my mill, and square the vise to the mill head itself, I would do a process called "indicating" the mill. This is to ensure that your vise sits as close to square and parallel to the table as possible. After I figured out how to do this, it didn't take too long to do.
Later I found that the keys didn't fit the slots on the mill table anyways, so they aren't going to do any good anyways!
Dial Indicator
A dial indicator is useful for measuring the amount of change from one position to another. Mine is a unit built by Compac, a Swiss company, and purchased from a company called Long Island Indicator Service. They had reviews of every indicator out there, both modern and old. They also repair the units, so you can expect that they know more about them than most people who just sell the items.
The Compac was one of the few dial indicators they had positive things to say about, and it seemed to be the unit that would be best suited for what I planned to do.
The little units (and I do mean little!) are not cheap, but they do something very precise, and that costs money. Add in reliability and proper design and construction, and you can see why cutting corners here is just not worth doing.
Indicator Holder
Holding the indicator is another problem, especially if you don't want to pull apart your setup to measure things. I found mention of an Indicol indicator holder in a few places, and found one at Enco. They aren't real expensive for what they do. They clamp onto your spindle and hold the indicator somewhere over your work. This is pretty much a necessity for working with a dial indicator.
Modifications
As I previously mentioned, I plan to convert the mill to CNC. That will happen at some point. Right now I'm learning how to use the mill manually. I think that is the best way to go. Now I have a lot more understanding of how things work based on the feel of the mill as I've used it.
Lights
One of the first things I noticed is a lack of light in my work area beneath the head. I've been looking at some modifications people have done to mount lights on their mills, and I decided to do the same. I looked into some motorcycle "angel eyes" lighting kits that would fit around the spindle entirely, but they were too expensive.
One thing I did have was some length of LED strip lighting, with adhesive on the back, from AllElectronics. I cut a few lengths of that, soldered some wires on for connecting the two in series. I removed the cover from the tape, pressed the lights in place, and conected a powerpack. The lights lit up just like I hoped, and they brighten the place up quite a bit.
Now I need to wire the lights into the control box, into a switch, and from there, into some source of power, prefereably in the mill electronics themselves. If we can't find one, maybe we'll get a transformer and install it in the box. I'd rather not have a second plug running to the mill.
Reversing Switch
Another item I want to get installed is a reversing switch. Seriously, this mill only runs forward? Not what I want to hear.
I actually opened the top of the motor up and looked. There are four wires running to the motor. This will take some doing from the looks of things. I need to find an electrical diagram, or a how-to article on the net, or something. I've heard of this being done, I just need to puzzle out the electricals and we'll make it happen.
CNCMasters Supra Mill and 1440 Turning Center Lathe
I took a vacation at the end of October, and went down to see my grandfather for his 92nd birthday. While I was down there, we went and visited my uncle's diesel repair shop for heavy semi trucks.
A few years ago, my uncle acquired a CNC mill, and a CNC lathe. Unfortunately, the only thing that he had ever managed to do with them was to actually get them uncrated. Beyond that, his business had taken up too much time for him to be able to work on getting them operational. Since I had an interest in such things, he asked me if I would take a look at them.
Oddly enough, even though I have no experience with one of these machines, I manage to get the CNC lathe operational first.
After that, I started working on the milling machine. This one actually had a bigger problem. I did manage to get the four axes operational, but the main spindle wouldn't start. After calling the company, CNCMasters, in California, we found the problem. Turns out one of the chips in the inverter that converts the power from single phrase to three phase had something happen to it.
Based on my own experiences with the company, I have to say I'm rather impressed with them. When you call them, a real person actually answers the phone! That's becoming harder and harder to find in this day and age.
Number two, they actually speak fluent English.
Number three, the person who answered the phone was not only capable of figuring out just which machine had been sold to me, based on where it was, but also knew what needed to be done to fix it, and how to troubleshoot the problem based on the symptoms reported.
Number four, they stand behind their equipment. Once we determined what had gone wrong (a chip on the inverter had failed) they offered to replace the chip if I would cover the shipping to and from the facility.
Number five, if they don't know the answer to a question, they'll find out fast. Once everything in been squared away with getting the inverter shipped back to them, I asked if the inverter from the lathe could substitute for the one on the mill. They put me on hold for a few minutes, asked around, and came back with the answer. (Turns out it could.) They walked me through the steps for hooking it up to the mill, and when all was said and done, everything worked like it should.
Working in IT, I spend a lot of time on the phone with tech support for various companies. CNCMasters ranks right at the top for support. I would not hesitate to recommend this mill based on this fact alone.
We had so much luck getting things working at the shop that my uncle purchased another piece of equipment he knew about that had been for sale nearby.
The PlasmaCam is a computer-driven plasma-welder that cuts shapes out of sheet metal. Depending on the capabilities of the welder attached, the PlasmaCam will happily chew 1"+ thick steel plates into whatever shape you can draw up.
You can use almost any source, whether CAD, line art, hand drawn, or anything else capable of generating a picture. Though it comes with a set of CAD plans for a table, we actually found the drawing for the last cut still in the scanner attached to the computer. The piece of sheet steel the previous owners had been using remained on the table and still had some usable space left, so we took care of "disposing" of it for them.
When we returned to the shop, we had to clear a space to set the unit up. Uncle Jeff put the roll-back at the door, while dad began clearing some leftover parts from the corner nearest the door.
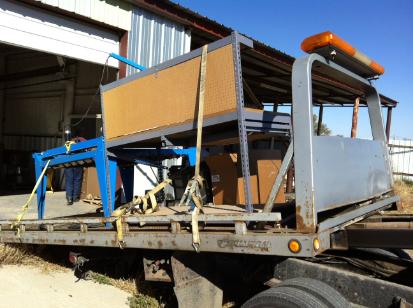
Here is a shot of the PlasmaCam on the truck. The blue part is the main frame that holds the metal being cut, and the plasma welder head. The blue arm up at the top suspends the cable so the head can move around without dragging the cable over the metal. The gray desk is what the computer is sitting on. The computer itself rode over in the cardboard box underneath everthing. Just to the left of the box, you can see a small, boxy, black and gray item. That is the plasma welder itself. A Hypertherm 1000, if I remember correctly.
PlasmaCam Computer
The computer that came with the unit ended up being in sad shape. It hadn't seen a connection to the Internet in quite some time (over a year) and had a number of issues.
Really, a machine of this nature doesn't need an internet connection, but it is handy. As the shop has a wireless network running, and my grandfather had a spare wireless card, I brought the unit back to my grandfather's house and installed the wireless card in the PlasmaCam computer.
The first problem we had to fix was the registration on the copy of Windows 7 that ran on the machine. It was there, and it worked, but the computer didn't think it was correct. I found the Windows 7 install disc and key and entered the key, and the computer quickly sorted that out with Microsoft. Once it had that settled, it was time for updates...
~117 or so later, we had the computer up to date, all the drivers installed, an antivirus program installed, and the wireless working. At that point, we called it a night, and spent the rest of the evening telling tall tales around the table with everybody. It was a full house! That, and the Southern accents were fun to listen to as well. Between my Uncle Jeff, Uncle James, and Aunt Cindy, we had plenty to listen to!
The next morning saw us lugging the computer back out and hooking it back up. We had the machine working the previous day (granted, on a piece of plywood, but you use what you have) so getting things installed and running didn't take long. Connecting things to the wireless network didn't take long, once we found out what the password was for the wireless network. (While I was at it, I set my phone up as well!) Once the computer had that info, it connected up to the network, so now it is ready and able to take care of updating itself, as well as driving the PlasmaCam.
One further upgrade we made to the unit was a tarp.
Yep, a tarp.
To keep the dust off. When we picked up the PlasmaCam, it was covered in dust. As was the computer. In fact, most everything in the shop was dusty. To avoid having to clean all of that up again, (which took my grandfather and I twenty minutes,an old coffee can, some water, and a roll of towels to accomplish) we picked up a tarp and when everything was installed, I covered it with a tarp.
No telling when the machine will be used, or how often, or any of that. When it is needed, though, it'll be there, ready and waiting.
And clean.
Remote Support
One of the biggest reasons we have the CNC milling machine and CNC lathe computer connected to the network is so that I can support the units remotely. The PlasmaCam computer now has this ability as well.
At this point, I'm the only one who has managed to get these units working. The problem is, the equipment is in Oklahoma, and I am in Washington state.
The nice thing is, having been working in IT and having done remote support for our outside units, I am well-versed in using remote-access software to connect to a computer and take a look at a user's screen. My preferred software is Ammyy Admin, though Join.me works in a slightly different manner that sometimes comes in handy.
Both allow me to see the same screen a user is seeing, once they have connected up with me. That way, I can guide them over the phone while watching "over their shoulder" so to speak.
At the very least, the mill will need this, as the unit is wating on a replacement inverter part before we get it up and running. Once that is up and running, then I'll be able to guide people through programming on the machine to allow them to use it as they need to.
As for the PlasmaCam, that will likely need a few rounds of support as well until people get used to using it, as the computer "loses" the PlasmaCam everytime it is disconnected, and the machine has to be disconnected right now because the control cable runs across a nearby doorway. Getting the computer to find the machine isn't too hard, but the command to do so is buired in a settings screen.